Tuesday, August 31, 2010

A Pine Box: Part One

Yes, the time has finally come when it's simply necessary for our unit to have a cooler at events. Not mandatory, because it would be possible to eat just dried meat and fresh veggies and fruits, but we're choosing to go with the option of being able to have some tasty meat dish roasting over our fire (and since we know a little more about germs and bacteria than the people of the 1750s, we're going to play it safe and keep our meat in a cooler).

However, being the passionate re-enactors that Erik and I are, we didn't want to just bring a cooler along and cover it up with a blanket. We wanted it to be securely hidden. Thus, the pine box was born. We chose pine for two reasons - firstly, it's cheap, and secondly, the Rangers are from (and spent a lot of time) "up North," where coniferous trees abound. Thus, pine seemed like the sensible option. The one thing we did not do before starting this project was to do a detailed research of boxes of the time. We knew they'd have several boards making each side, because plywood and particle boards weren't really an option during the time, and we wanted to make it look sort of like a crate, because the Rangers spent a lot of time on boats traveling on the rivers.

With these two goals in mind, we measured our guaranteed "Five-Day-Cooler" and headed to the lumber yard. We finally chose a variety of boards, loaded them up, and headed home.
The wood sitting in our garage, waiting for us to get started. We began that night with cutting the boards (by hand-sawing them) to the right lengths. Erik did the sawing, and I sat nearby and filed/sanded the edges down a little in order to avoid rough edges and splinters. After finishing several pieces, I stacked them up to the cooler - and realized we'd made a terrible mistake! We'd forgotten to account for the fact that when a board says it's one inch by six inches, it's actually more like 3/4ths of an inch by 5 1/2 inches. Fail! We had to go back to the lumber store the next day and get "1x2"s to put around the top edge so we'd have enough room for the cooler.

The next day, after buying more lumber and getting it cut and filed, we went to the next step - adding linseed oil. Linseed oil was used during the 1750s in order to make the wood a little more water resistant and to add just a little bit of a polished look to the wood. It's really not very noticeable at all, and doesn't really change the color of the wood. Erik had the great idea of lining up all our pieces on boards so we could conveniently "paint" all of them with the oil:
One thing about linseed oil: It is flammable, and even combustible! The rags can actually burst into flame if you're not careful with them, because of the large amounts of heat that come off the oil as it's drying. We didn't have any rags burst into flames, but I could feel the heat coming off of them! We had to wait another day for the linseed oil to dry. This is a good break point, so I'll return next time with Part Two: Joinery and Assembly!

Monday, August 30, 2010

Digression: Historic Fort Wayne

While this blog is intended to be for 18th century tangible things, I couldn't help mentioning where I've been the past few days. Over the weekend the hubby and I participated in a historical re-enactment at Historic Fort Wayne in Indiana. The re-enactment was of Fort Miamies during the Seven Years' War. Technically, the English and French didn't fight against each other at this fort. What did happen was that Hazen's Company of Rangers (our unit) came down from New France to tell the inhabitants of Fort Miamies that the war was over and the English had won. The Rangers then made a December trek all the way down to Fort Ouiatenon to tell the French there that they were the losers.

Since there were no actual historical battles at Fort Miamies, our goal was to interpret a "standard" weekend of battles and camp life. My brother and I played duty calls on our fifes for the soldiers, all of our unit participated in the battles, and our lovely ladies of the camp cooked the meals we'd worked out for the weekend. In addition to the battles, we also participated in some drilling, which included a very entertaining bayonet drill. Generally, a good time was had by all. We're an extremely young unit and have yet to learn a lot of the finer details of managing a camp, but we're getting there. Here are a few pictures from the event - and I promise I'll return you to your regularly scheduled program in my next blog!

Rachelle and myself working on batter for pound cake for the Saturday night participant potluck. Unfortunately, we still have a lot to learn in matters of cake-making over the fire... Oh well, live and learn! We were proud of the fact that we at least tried, and that we used a period recipe (just eggs, flour, butter, and sugar).

Rachelle seems to be enjoying her newly established role as a Camp Mother just a little too much, much to James' chagrin!

Ruth slaving over a hot fire in order to provide the rangers with a delicious lunch.

We put a chicken in one of the dutch ovens to boil - and left it there for about five hours. When we pulled it out, it was literally falling off the bone. Hubby Erik carved it up nicely for us - what a feast!


The boys set up an impromptu tomahawk target and had fun with some practice. I tried once or twice, but was feeling much too awkward in front of everyone to actually have fun doing it, so I decided to wait until I've had some practice at home and can throw with confidence before I try in public again! I enjoyed taking a few quick pictures of Luke (above) and the others, however.

Our set-up for the weekend - we were sleeping in the building directly behind our fly, so the fly was the only outside set-up we had for the duration of the event. You can tell by the random scattering of dishes that we don't yet have proper places for things in our camp. Luke (left) and Gerret don't seem too concerned about the mess, however.

These lovely ladies were just too pretty not to take a picture of - as you can see, I'm in the back practicing my ninja ranger guarding techniques. :-P I was also promoted to the rank of Sergeant at this event (Erik came up to me and said "Guess what, you're the sergeant now, so go to the sergeants' meeting." Oh. Okay then), so I'm now Sergeant Bob instead of Private Bob, at least for the time being. My musician duties are such that I probably won't have that rank for long (the sergeant was responsible for keeping the men in line, etc, and since I have to march with the musicians and not with our rangers, I can't exactly be there keeping them in line).

P.S. The camp box that Erik and I just completed worked wonderfully at this event. I'll talk about its construction in my next blog - stay tuned!

Wednesday, August 25, 2010

More On Paniers

As promised, I did more research on paniers (or panniers - the names are used interchangeably), and was extremely pleased with what I found. According to this Glossary of 18th Century Clothing Items, there were several types of paniers (which was mentioned in my last post), and each of the types of paniers have different names.

Hoops started in England (not in France, as I assumed because of their French name), "during the 1710s and were cone-shaped and, it seems, not always full-length. Depending on the source, they were introduced to France in 1718 or 1719. Soon their shape changed into a huge dome, spreading equally all around, which gave cause to much amusement (caricaturists) as well as consternation (church).
"The dome quickly decreased in size and flattened in front and back, then flattened even more into a broad oval. Around the middle of the century, the panier was divided into two baskets, one over each hip, and still later received pads on top so that it reached the elbows. Other developments are half-length paniers with flounces round the hem, and a short, wide and boxy panier that only reached to mid-thigh. In the 1780s, paniers vanished altogether and were replaced by pads." (Glossary of 18th Century Clothing Items)

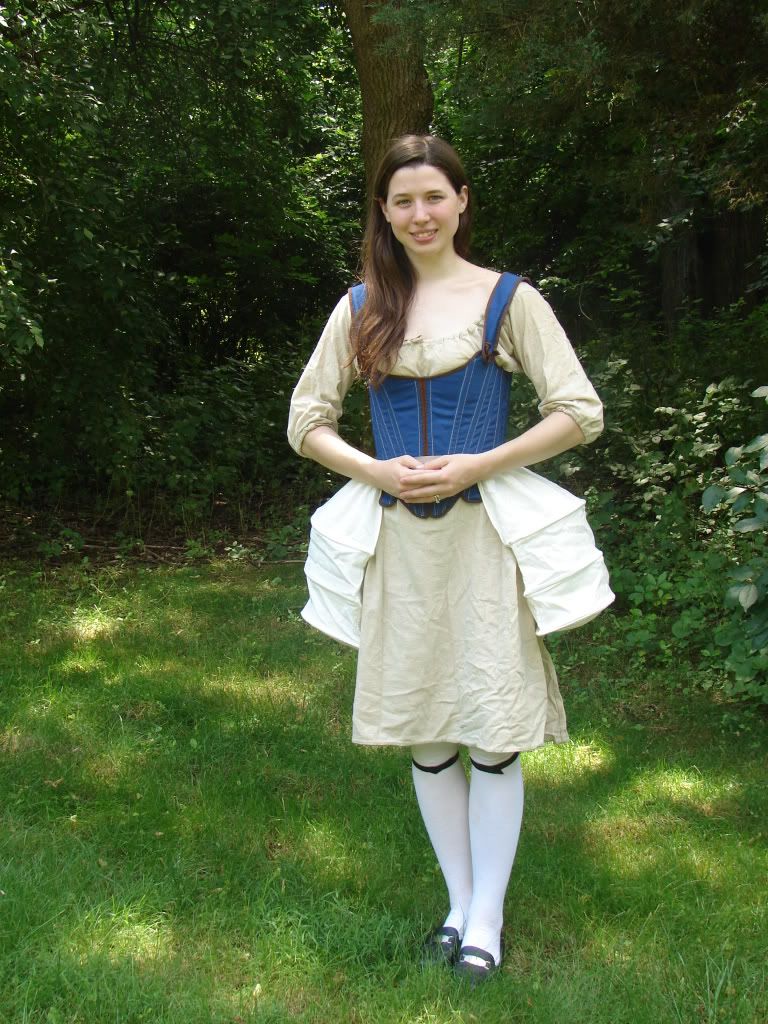
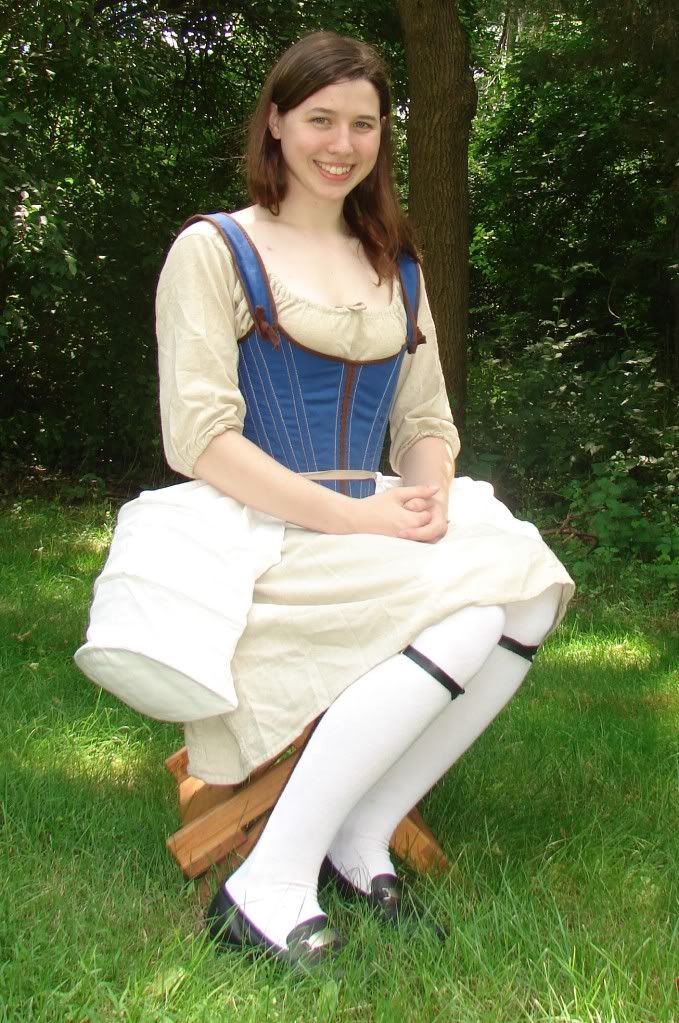
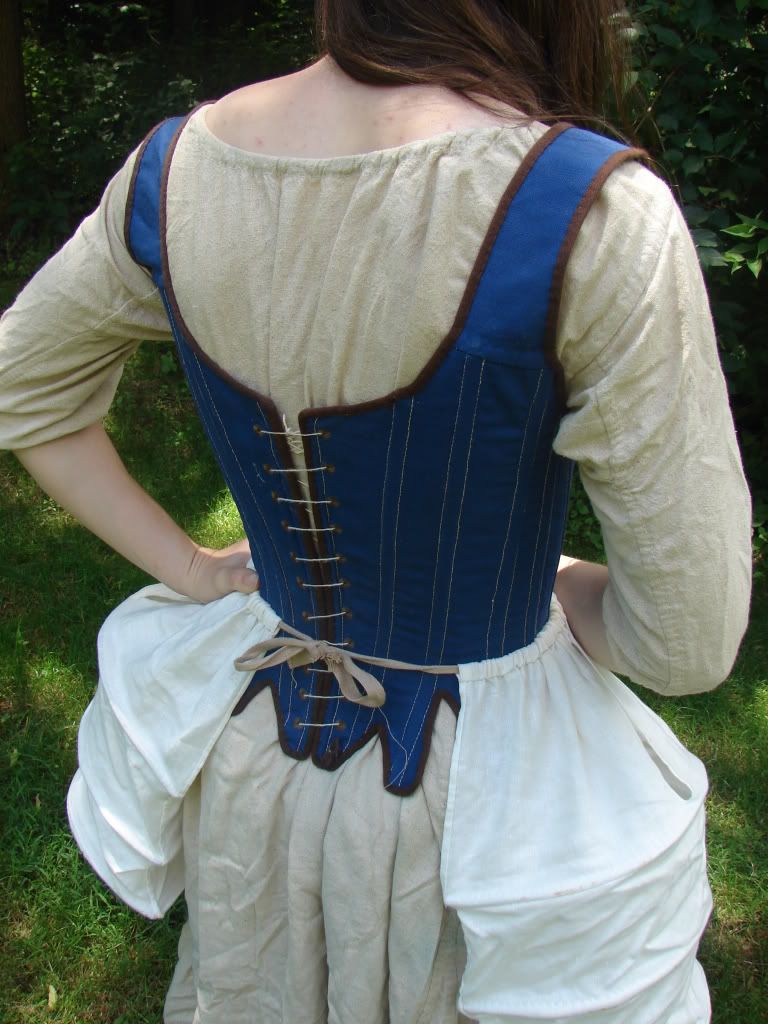
 The "short, wide, boxy paniers" that theoretically were predominantly British, (as is this pair).

This revelation highly pleased me, as it appears that the mid-century paniers were the separate-pocket type, which is what I made. Yay for that serendipitous occasion! The Glossary also included several terms for the specific types of paniers. I've copied them over from the Glossary.

panier a coudes - paniers with an oval dome shape

panier janseniste - A short kind of panier, stiffened with horsehair or hoops, that replaced the long, heavy paniers of the first half of the century. It is sometimes identified with considerations.

criarde - an early kind of panier, or its ancestress. Being made of gum-stiffened fabric, sometimes involving leather and cane in its construction, it gave off a screeching, squeaking sound in movement. First used by actresses to add volume to their costumes, it is thought to have been adopted as the earliest kind of panier.

a bourrelets - flaring paniers

a coupole - dome-shaped paniers

considerations - A short, small kind of panier, sometimes identified with the janseniste, sometimes with what in English is called pocket hoops: Two small "cages" of calico or linen with each three rows of boning in tunnels, slightly flaring, attached to a waistband. One sat over each hip, so they were also called "false hips". Both had a slit at the top into which a pocket, also attached to a waistband, could be hung. But as the pocket hoops were closed at the bottom, they could also be used as pockets in their own right - hence the name (this is what I have).


This dress could very well have "considerations," otherwise known as "pocket hoops" (dress from the 1750s), which is what I used for my dress (see my earlier blog on paniers for a picture of my pair).

So, now you know even more about paniers (like you needed more superfluous information rattling around in your brain, right?) I'm pleased to know more on the topic - now when I'm wearing my dress and people ask about the shape, I can explain how it evolved through the different periods and became the pocket-hoops that I wear.

Monday, August 23, 2010

Nails In The Coffin

My husband Erik and I just recently finished (sort of) a pine box. Our re-enacting unit has grown large enough that we've decided to start cooking for ourselves, instead of going out and mooching from the other units. Erik and I are very intense about re-enacting and being period correct, but we're willing to sacrifice a small amount of correctness for the sake of our health. Hence, the pine box. We made it especially so that it could hold and hide our cooler. As I said, we're intense about re-enacting, but if we're going to have any fresh meat with us, we're going to play it safe and keep it in a cooler.

I'll be adding entries and pictures about the making of the box soon, but first I want to talk about nails. We don't really think about them all that much these days. You go to the store, you buy them, you use them. They're small, cheap, and handy. They're also relatively easy to make in this day and age. However, this was not the case during the 1700s.

Up until the tail end of the 1700s, each nail had to be painstakingly hand-crafted. Originally from RICS Building Conservation Journal, "For nail making, iron ore was heated with carbon to form a dense spongy mass of metal which was then fashioned into the shape of square rods and left to cool. The metal produced was wrought iron. After re-heating the rod in a forge, the blacksmith would cut off a nail length and hammer all four sides of the softened end to form a point. Then the nail maker would insert the hot nail into a hole in a nail header or anvil and with four glancing blows of the hammer would form the rosehead (a shallow pyramid shape)."

(from: Glasgow Steel Nail )

As you can see, this was no easy task! The blacksmith had to shape his metal into square rods, and then cut off sections and draw out the metal until it formed a point at one end - and then he had to manually form the head. Nails of this time were square, and really held things together well. The heads of these nails would be square-ish, and would have the pyramid shape described above. Here are a few pictures of period nails:


(Pictures from The Harp Gallery)

Square nails actually have a much better hold than round ones (round wire nails weren't made until the end of the 1800s). It's no wonder every village had a blacksmith! I read somewhere in my perusings that when a family moved, they would often burn down their old house in order to retrieve the nails from it, which gives you a good indication of how valued nails were during the time period. At the end of the 1700s, nails were being cut from sheets of steel, which made them much more rectangular. A hundred years after that, steel wire was introduced and the modern nail was born. Although much, much cheaper, the modern nail just doesn't have the same holding power as a good old square nail!

For a comparison of nails, check out this Historic Preservation Research post by The University of Vermont.

P.S. Antiques dealers and historians alike use our knowledge of nails to help identify the time period of pieces of furniture. If a piece of furniture was constructed using cut nails, researchers know that this piece was most likely made some time during the 1800s. Neat, huh?

Sunday, August 22, 2010

Panniers: The Making Of

Panniers - from the French word "panier" meaning "basket" - are basically just that - baskets. They're sort of giant basket-pockets that hang on each side and make your hips look really big. It was cool to have huge hips in the 1750s. If you had big hips, you could make good babies! Now, because most women don't have hips that span several feet across (seriously, check this out), something had to be used to make those huge hips.

There are a few different methods, from what I've read and uncovered, of making panniers One method largely resembles a hoop skirt, except flat in the front and back. This type is apparently the "French" style. Another method is much more angular, and only goes down to the tops of ones knees. This type seems to be of English descent. The third option is "pannier pockets," which seem to be the simpler version of panniers. I'm not entirely sure how historically accurate the pannier pockets are - they seem to be accurate, but I have not read anything yet either proving or disproving them. I'll update as I find more information.

I found directions from Picture Perfect Panniers online, which was very handy, as I didn't really want to have to wait for a pattern to be shipped to me. This was the main impetus behind choosing the pocket pannier style. Additionally, having huge pockets like that really tickled my fancy. I just had to make them. I chose a white linen in the middling range of fineness, and got to work.


 The website's directions made pockets that went down past my knees. This didn't seem very efficient to me, so I developed my own pocket dimensions based on my somewhat petite size. I then cut out the pieces and started sewing. Also, instead of using bias tape to make the casings, I folded the fabric to make casings.


The pannier in this picture is very nearly complete. I used wire coat hangers as boning - not the most historically accurate, but better than a lot of other options - and finished up my giant pockets. The hardest part was closing the side of the pannier after I'd added the boning. As a postscript to this project, I added cotton ribbon down the sides because the wire coat hangers were poking through the rather loosely-woven linen. I would NOT recommend coat hangers to others. Plastic is actually the most closely resembling modern material to period boning.


After I was finished with the panniers, I put on my chemise, stays, panniers, and a skirt over the top to judge the effects. The first snapshot is the result of that endeavor (ooh, silhouette!), while the picture beneath it is of the completed panniers (prior to adding the cotton ribbon down the edges).

Friday, August 20, 2010

I See London, I See France...

While it's true that those from the 18th century did not wear underwear as we know them, underwear - at least for the 18th century woman - constituted a large portion of the clothing items worn.

Every 18th century woman had two basic pieces of undergarment - a chemise (or shift, if you're English) and stays. The chemise (pronounced sheh-MEES) was a woman's nightgown, underdress, and basic, everyday garment. A woman would wear her chemise constantly, both night and day. The chemise was the "panties" of the 18th century period. Shifts or chemises would usually be made out of linen, as that was the most common fabric of the time (the cotton gin had not yet been invented). The fineness of the linen was determined based on one's social class. If you were a higher class citizen, you could afford a finer linen.

And for a bra? How about something roughly the dimensions of a tank top, but with whale-bone inserted all the way around? This article - known as stays, or jumps if they're without boning - was also a staple for the 18th century woman, just as a bra is a staple for most of us modern women.  This garment also would have been made out of linen, although it would have been a much coarser and heavier linen than that used for a chemise or shift. Stays helped define a woman's waist and bust, and provided support for the conical figure that was highly desired during the time period. Although stays sound scary, I actually prefer my pair over modern undergarments! Stays provide excellent support for your back, and give those of us with small busts a little extra "boost"! The downside? They lace up the back, so you need assistance donning them (even poor women would not have been expected to dress all by themselves).

There is one other undergarment piece that was more or less optional. Known as panniers, these "giant pockets" helped provide women with the large-hip look, which was extremely popular for the time (the bigger your hips, the easier you could birth children). Panniers - from the French word "panier" - would have been constructed of linen and had channels sewn through them. Boning or reeds would then have been added to the channels, thus making  sort of half-baskets at each side of the woman's body. The best part about panniers? They really are giant pockets, which can be reached by slits in the woman's dress or skirts. You can fit everything but the kitchen sink in these babies!

An Introduction To Me

Greetings!

Allow me to take this opportunity to introduce myself a little before you join me on my adventures. I'm a young housewife from the midwest who thoroughly enjoys history, particularly that of the 1750s and 1810s. Now, this does not mean that I can tell you the dates surrounding the Siege of Louisbourg. I've never been good with dates and names, and can barely even recite the years during which the French and Indian War (or Seven Years' War) occurred. I'm terrible with memorization - but give me something tangible, like wood, or fabric, or sheets of music, and I'm completely mesmerized. I love learning about fashion of the time, or about what nails looked like in the 1750s (and how they were made).

I am a historical re-enactor. I've been going to events in period garb since my parents dressed me in a chemise and took me to my first event at nine months of age. At the age of thirteen I made the hobby my own by sewing all my own clothes. The next year I got involved in a junior fife and drum corps, and I've never looked back. After nine years of spending almost every fall and spring weekend at events, I don't know what I would do with my time! I've spent time in both the English and French camps, and have in the past few years been striving to further develop my knowledge about tangible things - things I'll be able to remember!

I do other things in my life, of course, but this blog is one dedicated to my projects, discoveries, and research involving the wonderful world of history. I have two completed projects that I will be adding shortly (an embroidered waistcoat and a sacque-back dress), as well as two more projects that are currently in the works (knitting and woodworking!), so please join me, follow along, and discover the wonders of the eighteenth century!